| Type: | Package |
| Title: | Interactive Functions to be Used as Shortcuts in 'RStudio' |
| Version: | 1.12 |
| Date: | 2024-10-30 |
| Description: | 'RStudio' as of recently offers the option to define addins and assign shortcuts to them. This package contains addins for a few most frequently used functions in a data scientist's (at least mine) daily work (like str(), example(), plot(), head(), view(), Desc()). Most of these functions will use the current selection in the editor window and send the specific command to the console while instantly executing it. Assigning shortcuts to these addins will save you quite a few keystrokes. |
| Depends: | base, stats, R (≥ 3.5.0) |
| Imports: | DescTools (≥ 0.99.30), rstudioapi (≥ 0.1), manipulate, writexl, foreign |
| URL: | https://github.com/AndriSignorell/DescToolsAddIns/ |
| BugReports: | https://github.com/AndriSignorell/DescToolsAddIns/issues |
| License: | GPL-2 | GPL-3 [expanded from: GPL (≥ 2)] |
| LazyLoad: | yes |
| NeedsCompilation: | no |
| Packaged: | 2024-10-30 13:54:09 UTC; andri |
| Author: | Andri Signorell  [aut, cre]
 |
| Maintainer: | Andri Signorell <andri@signorell.net> |
| Repository: | CRAN |
| Date/Publication: | 2024-10-30 15:00:02 UTC |
Insert an Arrow Into a Plot
Description
Places an arrow into a plot. Two additional arrow heads are implemented.
Usage
Arrow(x0, y0, x1, y1, col = par("bg"), border = par("fg"), head = 1,
      cex = 1, lwd = 1, lty = 1)
Arguments
x0, y0 |
coordinates of points from which to draw. |
x1, y1 |
coordinates of points to which to draw. At least one must the supplied. |
col |
the color of the line and background color of the arrow head. |
border |
color of the arrow head. |
head |
type of head, can be one out of 1:3. |
cex |
extension factor for the arrow head. |
lwd |
line width |
lty |
line type |
Value
Nothing returned
Author(s)
Andri Signorell <andri@signorell.net>
See Also
Examples
library(DescTools)
Canvas()
Arrow(1, 1, 0, 0)
Plot All Named R Colors
Description
ColPicker() plots the R-colors in a dense manner and allows to collect colors by using a locator. This can be helpful when some colors should be put together to a palette.
Usage
ColPicker(locator = TRUE, ord = c("hsv", "default"), label = c("text", "hex", "dec"),
          mdim = c(38, 12), newwin = FALSE)
Arguments
locator |
logical, defines if the colors can be selected by mouseclick. Default is TRUE. |
ord |
the order of the colors, can be either defined by hsv-value or by the R internal color-number. Default is the latter. |
label |
label for the colors, can be the colorname (text), the hex-code (#RRGGBB) or the decimal RGB-number |
mdim |
the dimension of the color matrix. Default is 38 rows and 12 columns. |
newwin |
logical, defining if a new graphic device should be used. Default is |
Details
The function plots all the colors but leaves out the grey scales grey() and gray().
Author(s)
Andri Signorell <andri@signorell.net>
See Also
Examples
ColPicker(locator=FALSE, ord="hsv")
ColPicker(locator=FALSE, label="hex")
Display Color Dialog to Choose a Color
Description
Choose a color by means of the system's color dialog. Nice for looking up RGB-values of any color.
Usage
ColorDlg()
Value
RGB value of the selected color
Author(s)
Andri Signorell <andri@signorell.net>
See Also
Import File In Foreign Format
Description
Import a file in SPSS, Stata, SAS, Minitab or Systat format interactively.
Usage
FileImportDlg(auto_type = TRUE, env = .GlobalEnv)
Arguments
auto_type |
determines if the type dialog should be displayed. Default is |
env |
environment in which the dataset should be created. |
Details
The imported file will be assigned to the given variablename.
Author(s)
Andri Signorell <andri@signorell.net>
See Also
read.dta(), read.spss(), read.systat(), read.ssd()
Get the Path of a Data File to Be Opened
Description
Handling of pathnames is tedious in Windows because of the backslashes, that prevent simple pasting of a copied path into the source code. FileOpenDlg() displays the FileOpen-Dialog for picking a file interactively. When done, backslashes in the returned path will be replaced by simple slashes as used in R path definitions. The edited path is returned.
Usage
FileOpenDlg(fmt = NULL)
Arguments
fmt |
the format, in which the filename parts should be returned. This can be defined quite flexible containing the elements path, filename and ext (file extension) enclosed by %. |
Details
There are 2 predefined formats that can be addressed with fmt = 1 resp. fmt = 2.
1 will return the path enclosed by a typical read.table(...) command, 2 will do the same with load(...).
Value
character string containing the path (also present in the clipboard)
Author(s)
Andri Signorell <andri@signorell.net>
See Also
Examples
## Not run:
# choose a file
fn <- FileOpenDlg()
print(gettextf("You chose the file: %s ", fn))

# the path and filename can as well be nested in a command,
#   done here to build a read.table command that can be well inserted into the code:
FileOpenDlg(fmt="d.%fname% <- read.table(file = \"%path%\%fname%.%fxt%\",
  header = TRUE, sep = \";\", na.strings = c(\"NA\",\"NULL\"), strip.white = TRUE)")

# go to your editor and paste...

## End(Not run)
Compose Model Formula
Description
ModelDlg() allows to compose model formulas based on the variablenames of a data.frame. The available variables can be filtered and sorted, which is helpful to keep the overview. Additional orientation is provided by the comments with which variables can be assigned. (See Label()). The labels will be displayed below the variable list.
The model dialog can also be used to edit an already existing formula. Simply select the model formula (including the data argument) and start the dialog.
Usage
ModelDlg(x, ...)
Arguments
x |
the data frame containing the variables for the model. |
... |
further arguments to be passed to the default function. |
Details
In the model dialog, the variablenames (extended with their class) of the selected data.frame are listed on the right, from where they can be inserted in the model box by clicking on a button between the two boxes. Clicking on the + button will use + to concatenate the variablenames.
The same applies analogously to * and :. x^2 inserts the chunk poly(<varname>, 2), the grade of the polynom can easily be changed in the formula edit field afterwards.
Any criteria for the variablename can be entered in the filterbox. The filter will be dynamically applied to the list. In order to get rid of the filter just empty the filterbox.
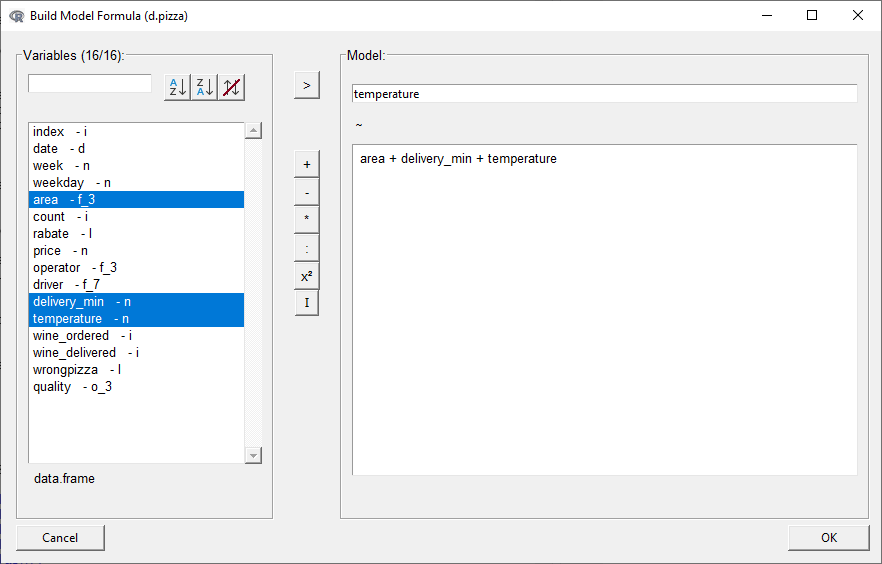
After clicking on ok, the formula temperature ~ area + driver + delivery_min, data=d.pizza will be inserted on the cursor position.
An already constructed formula can also be provided to the function. The model dialog will separate the single parts and populate the according textboxes.
Value
the model formula
Author(s)
Andri Signorell <andri@signorell.net>
See Also
Examples
## Not run:
ModelDlg(d.pizza)

## End(Not run)
Operating MS Word
Description
Controlling MS Word with RStudio has many convenient advantages. We can quickly create some reports on the fly and also use bookmarks to create dynamically updatable report chunks such as tables or graphics. Here we implement a set of functions to handle bookmarks in MS Word.
Usage
ToWrd()
ToWrdWithBookmark()

WrdBookmarks()
CreateBookmark()
SelectBookmark()
UpdateBookmark()
DeleteBookmark()

RenameBookmark(name, newname, wrd = DescToolsOptions("lastWord"))

RecreateBookmarkChunk()
Arguments
name |
the name of the bookmark. |
newname |
the new name of the bookmark. |
wrd |
the pointer to a word instance. Can be a new one, created by |
Details
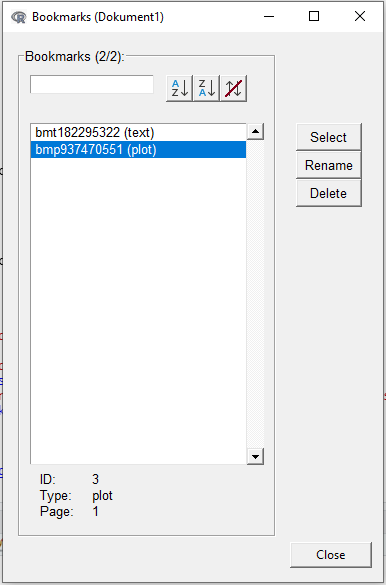
WrdBookmarks() returns a data frame with all bookmarks in the current document (given by a handle created with GetCurrWrd() or GetNewWrd() and stored in DescToolsOptions("lastWord")), containing the bookmark's name, its id and type ("text", "plot", "other"), as well as the page number in the document where it starts.
   > DescToolsAddIns::WrdBookmarks()
     id         name pagenr type
   1  2 bmt182295322      1 text
   2  3 bmp937470551      1 plot
ToWrd() directly sends the evaluation of the selected object in the source panel to the current Word instance. The function is generic and acts in dependency on the selected object. So far there are interfaces for characters, tables, models. Note that the inserted text is no longer updateable; as soon as it is inserted in the Word document the connection to it is lost.
ToWrdWithBookmark() inserts the object in the Word document and defines a bookmark that covers the whole range of the inserted object (including tables or graphics). Then the selected command chunk in the Rstudio source pane is enclosed in brackets and the name of the new defined bookmark is therein inserted as meta tag. If the R-code is later changed, the output in Word can simply be refreshed by selecting the code chunk in RStudio (including the meta tag) and click on the menu UpdateBookmark() (of course it's convenient to have a shortcut defined for that).
CreateBookmark() creates a bookmark at the current cursor position in a in an open Word document, using the currently selected text in RStudio as name. SelectBookmark(), DeleteBookmark() behave analogously.
RecreateBookmarkChunk() recreates the selected chunks in RStudio by inserting a bookmark if not existing and updating it with the result.
With the BookmarkDlg() there's an interactive support for handling bookmarks. Found bookmarks are presented in a sortable and filterable listbox. Selecting, deleting and renaming (not yet implemented) the selected bookmark is supported.
Author(s)
Andri Signorell <andri@signorell.net>
Information Plots
Description
The function PlotPar() plots the typically used parameters and their values.
Usage
PlotPar()
PlotPch(col = NULL, bg = NULL, newwin = FALSE)
PlotMar()
Arguments
col |
the default plotting color for |
bg |
The color to be used for the background of the plot symbols. Default is |
newwin |
logical, defining if a new graphic device should be used. Default is |
Details
PlotPch() will display the plot characters as defined by pch in all plots in a dialog.
PlotMar() plots the margins.
Author(s)
Andri Signorell <andri@signorell.net>
See Also
Examples
PlotPar()
PlotPch()
Some Functions to be Used as Shortcuts in 'RStudio'
Description
A simply great new feature in RStudio is the option to define add-ins and bind shortcuts to them.
This package includes add-ins for some of the most frequently used functions
in a data scientist's (at least mine) daily work (like str(), example(), plot(), head(), view(), Desc()).
Most of these functions use the current selection in RStudios source panel and send the specific command to the console
where it is executed immediately.
Assigning shortcuts to these add-ins saves you tons of keystrokes and brings a breeze of liberating and brake-releasing GUI-interaction into your R-life.
Usage
NewObject()
FileOpen()
FileBrowserOpen()
FileSaveAs()
GetExcelRange(env = .GlobalEnv, header = FALSE, echo = TRUE)
GetExcelRangeH(env = .GlobalEnv)
GetExcelTable(env = .GlobalEnv)
XLView()
IntView()

Edit()
FlushToSource()
Select()

Str()
Str1()
Abstract()
Head()
Some()
Summary()
Cat()
Desc()
Example()
Info()
Unclass()

Plot()
PlotD()
SetArrow()
InspectPnt()

Enquote()
EnquoteS()
RemoveDuplicates()
SortAsc()
SortDesc()
Shuffle()
EvalEnquote()
FlipBackSlash()
Arguments
env |
Environment for GetExcelRange to write the data. GlobalEnv is default. |
header |
logical determining if the import from XL should use a header or not |
echo |
should the function return an echo |
Details
The following add-ins are available:
-
NewObject:
starts the good old internal editor and allows to enter values. In dependence of the initial selection in the code panel different objects will be returned. If the selection wasmthe code for a matrix will be created, if the selection isdthen the code for a data.frame will be returned and a c will be interpreted as vector. Default ism. Note that column names can be defined within the editor, but not rownames (don't ask me why ...). -
FileOpen:
get the path of a file to open and insert in code. (See also:Select()) -
FileBrowserOpen:
get a selected path and opens the systems filebrowser with the according directory. -
FileImport:
display the import file dialog for importing SAS, SPSS, Stata, Systat and MiniTab files. (SeeFileImportDlg()) -
FileSaveAs:
display a file dialog, get the desired path and filename and save the selected object in the given place. Several file types are supported csv/xlsx for data.frames, text/binary for other objects. -
GetXLRange:
run DescTools commandXLGetRange()by taking the current selection as name for the imported data and replace the current selection by the used code. -
GetXLTable:
run DescTools commandXLGetRange()by taking the current 3-fold selection as data matrix, rownames and columnnames and replace the current selection by the structure code. -
XLView:
view selected object in MS-Excel, which makes sense for data.frames. -
IntView:
view selected object with internal viewer (here again: only data.frames) -
Edit:
run R-commandfix()on the current selection. This is nice for editing data frames interactively. -
FlushToSource:
rundputon the current selection and replace the selection with the result. -
Select:
select or pick things interactively. This function as well evaluates the current selection. If the selection corresponds topcha dialog for selecting point characters will be displayed. If it'scoltheColPicker()dialog will be displayed. If it's any ofpath,fn,filetheFileOpen()dialog will be displayed. In all other case theSelectVarDlg()on the current selection will be run. This can be used to select variablenames of adata.frameby mouse click or the levels of a factor (all depending on the class of the selected object). The variable names will be returned as string, enquoted and separated by a comma. -
Str,Str1:
run DescTools commandStr()on the current selection,Str1()shows only the first level ; -
Abstract:
run DescTools commandAbstract()(a less technical description thanstr(), meant for using with data.frames) on the current selection -
Head:
run R-commandhead()on the current selection -
Some:
run DescTools commandSome()on the current selection -
Summary:
run R-commandsummary()on the current selection -
Cat:
run R-commandcat(..., sep="\n")on the current selection -
Desc:
run DescTools commandDesc()on the current selection -
Example:
run R-commandexample()on the current selection -
Info:
print object properties of the currently selected object -
Unclass:
run R-commandunclass()on the current selection -
Plot:
runplot()on the current selection -
PlotD:
runplot(Desc())on the current selection -
SetArrow:
place an arrow in a plot and insert code into source file -
InspectPnt:
LauchIdentifyA(... , poly=TRUE)with the current selection as argument and returns the selected points on the plot. -
BuildModel:
display dialog for building up a model formula interactively by point and click. (SeeModelDlg()) -
Enquote,EnquoteS:
split the selected text in the source panel using line breaks as separators, enquote the sections using either double or single quotation marks, and paste them separated by comma. -
RemoveDuplicates:
remove all the duplicates (by row) of the selected text. -
SortAsc,SortDesc,Shuffle:
sorts the selected text by row in ascending, descending, resp. random order. -
EvalEnquote:
evaluates the selection before enquoting the parts and paste them separated by comma. This can be used to enquote factors. -
FlipBackSlash:
Handling backslashes in pathnames can be really annoying on Windows. This function replaces all backslashes in the selected text by simple slashes. In the first step all backlashes are replaced by slashes, in further applications of the function, flipflops are performed between slashes and backslashes. The optionReplaceDoubleSlashcontrols whether double slashes should be replaced by simple ones.
It's cool to set this command to the keyboard shortcut:Ctrl+Shift+/
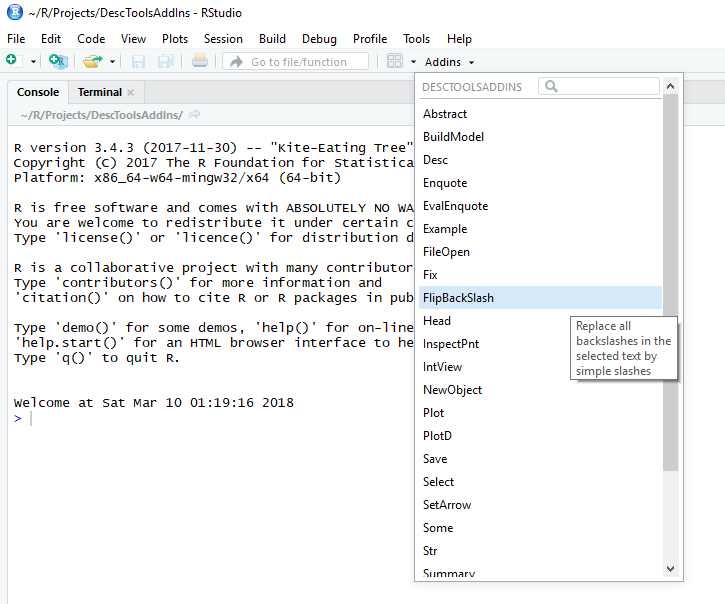
As soon as the package is loaded once, the AddIns will be listed in RStudios AddIns listbox:
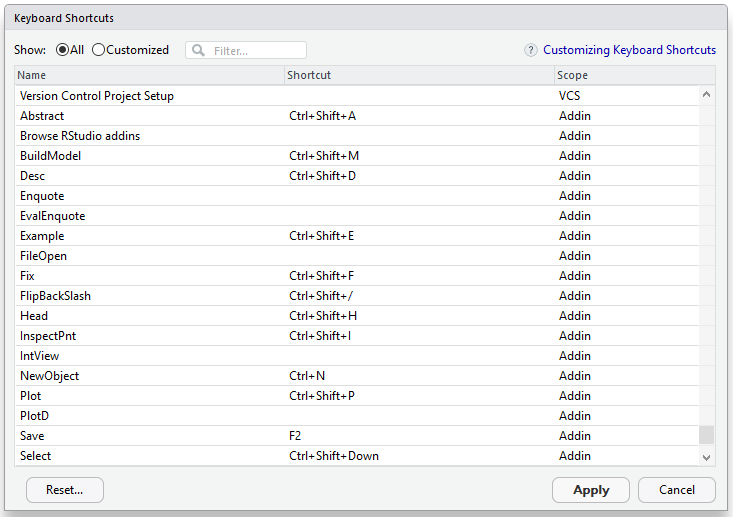
The keyboard shortcuts can then be assigned by clicking on the menu Tools | Modify Keyboard Shortcuts... and scroll down to the Addin scope:
Author(s)
Andri Signorell <andri@signorell.net>
Examples
if (interactive()){
  Str()
}
Select Elements of a Set by Click
Description
SelectVarDlg() is a GUI utility, which brings up a dialog and lets the user select elements (either variables of a data.frame or
levels of a factor) by point and click in a listbox. The list of selected items is written to the clipboard so
that the code can afterwards easily be pasted in the source file.
This function is best used together with the package DescToolsAddIns, with which the functions can be assigned to a keystroke in RStudio.
Usage
SelectVarDlg(x, ...)

## Default S3 method:
SelectVarDlg(x, useIndex = FALSE, ...)

## S3 method for class 'factor'
SelectVarDlg(x, ...)

## S3 method for class 'data.frame'
SelectVarDlg(x, ...)
Arguments
x |
the object containing the elements to be selected. x can be a data.frame, a factor or any other vector. |
useIndex |
defines, if the enquoted variablenames (default) or the index values should be returned. |
... |
further arguments to be passed to the default function. |
Details
When working with big data.frames with many variables it is often tedious to build subsets by typing the
columnnames. Here is where the function comes in offering a "point and click" approach for selecting the interesting
columns.
When x is a data.frame the columnnames are listed,
when x is a factor the according levels are listed and in all other cases the list is filled with the unique elements of x.
SelectVarDlg() checks for an option "selkey" for defining the selection keywords, defined as a list of this structure:
file | the keywords to be interpreted as a filename, defaults to c("fn","file","filename") |
dir | the keywords to be interpreted as a directory name, defaults to c("path","dir") |
col | the keywords to be interpreted as a color, defaults to c("col","color") |
pch | the keywords to be interpreted as a point character, defaults to c("pch")
|
It can be set with
  options(selkey = list(file=c("fn","file","filename"),
                        dir=c("path","dir", "dirname"),
                        col=c("color", "col"),
                        pch=c("pch"))
  )
Value
A comma separated list with the selected values enquoted is returned invisibly as well as written to clipboard for easy inserting the text in an editor afterwards.
Author(s)
Andri Signorell <andri@signorell.net>
See Also
Examples
## Not run:
SelectVarDlg(x = d.pizza$driver)
SelectVarDlg(x = d.pizza, useIndex=TRUE)

SelectVarDlg(d.pizza$driver)

x <- replicate(10, paste(sample(LETTERS, 5, replace = TRUE), collapse=""))
SelectVarDlg(x)

## End(Not run)
Interactive Graphical Data Explorer
Description
Use RStudio's manipulator to explore a data.frame by dynamically creating xy-scatterplots, boxplots and others. Numerical descriptions can as well be produced on the fly.
Usage
Xplore(x)
Arguments
x |
the data.frame to be explored. |
Details
This function helps to get rid of the afterwards superfluous R-code created while exploring a dataset.
Author(s)
Andri Signorell <andri@signorell.net>
Examples
## Not run:
Xplore(d.pizza)

## End(Not run)
Choose a Folder Interactively
Description
Choose a directory interactively.
Usage
dir.choose(default = "", caption = "Select directory")
Arguments
default |
which directory to show initially. |
caption |
the caption on the selection dialog |
Value
A length-one character vector, character NA if 'Cancel' was selected.
Author(s)
Andri Signorell <andri@signorell.net>
See Also
Examples
## Not run:

dir.choose(getwd(), "Choose a suitable folder")

## End(Not run)